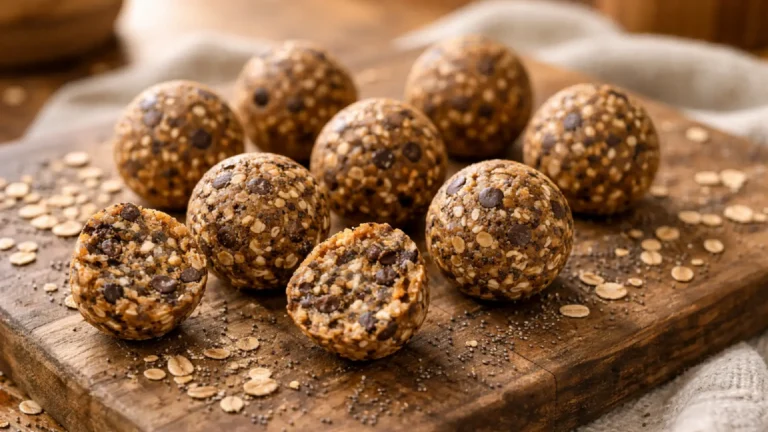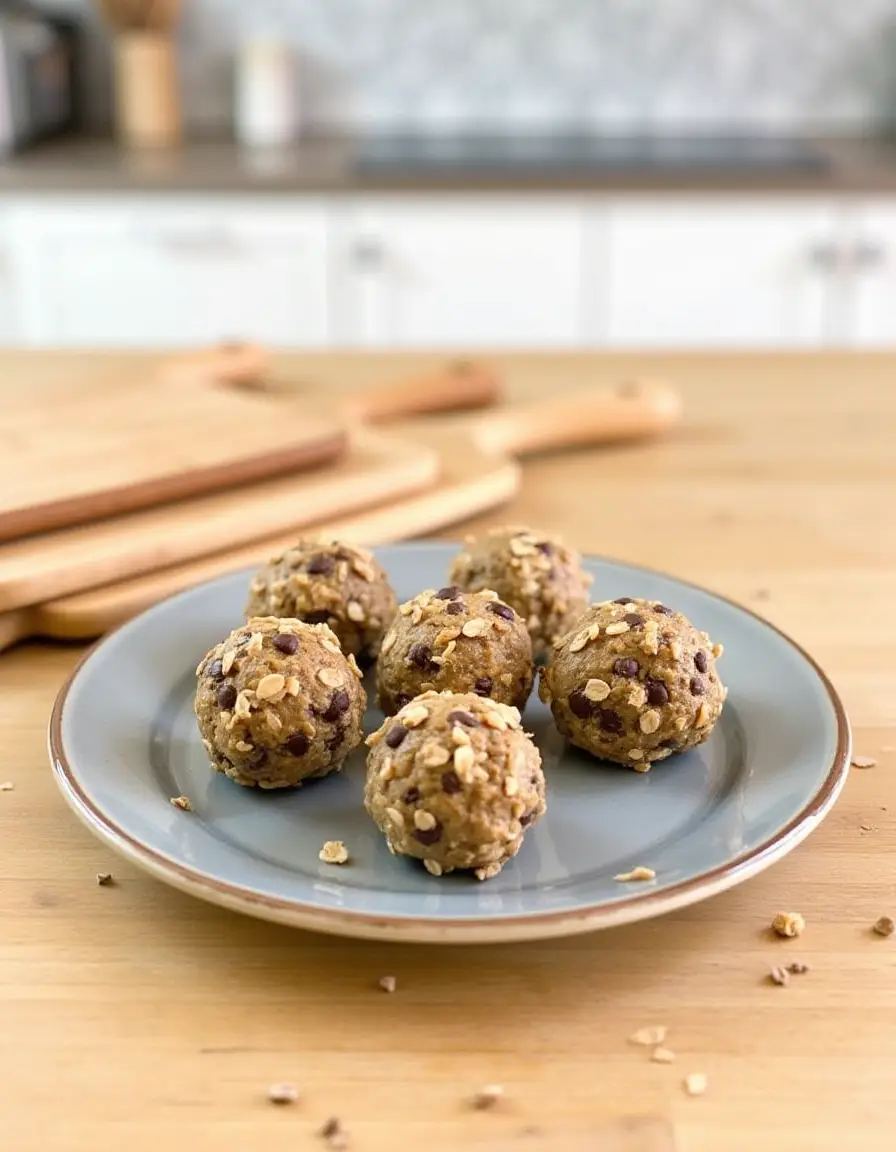
The Perfect No-Bake Peanut Butter Oatmeal Balls: A Recipe That Finally Makes Sense
The Perfect No-Bake Peanut Butter Oatmeal Balls
There’s something magical about recipes that require no oven, no complicated techniques, and deliver consistent results every single time. These no-bake peanut butter oatmeal balls are exactly that kind of recipe—the one you’ll turn to again and again when you need something sweet, satisfying, and secretly wholesome.
I’ve spent years perfecting this recipe, learning through trial and plenty of error what makes these balls hold together beautifully instead of crumbling into disappointing messes. The secret isn’t in exotic ingredients or complicated techniques—it’s in understanding how four simple pantry staples work together to create something truly special.
Whether you’re meal prepping for a busy week, looking for an after-school snack that won’t spike blood sugar and tank energy, or just craving something sweet that doesn’t require turning on the oven, these balls deliver. They taste like peanut butter cookie dough, pack genuine nutritional value, and can be customized in dozens of ways to suit your family’s preferences.
What makes this recipe different? Unlike many no-bake recipes that promise simplicity but deliver inconsistent results, this one actually works. The ingredient ratios have been tested countless times, the technique eliminates common problems, and the result is a treat that tastes indulgent while being made from wholesome ingredients.
Ingredients
What You Need (Probably Already in Your Pantry):
- 1 heaping cup rolled oats – The foundation that holds everything together
- 1/2 cup smooth peanut butter – The star that brings richness and protein
- 1/4 cup mini dark chocolate chips – Because life’s too short for sad snacks
- 1/3 cup maple syrup or honey – The gentle sweetness that binds it all
Optional Boosters (For When You’re Feeling Fancy):
- 2-3 tablespoons nut milk – If your mixture needs help coming together
- 1 tablespoon chia seeds or ground flax – Extra nutrition that doesn’t change the taste
- Pinch of sea salt – Trust me, it makes everything better
🥜 Recipe Scaling Calculator
Adjust Maria’s Peanut Butter Oatmeal Balls for any crowd size
📋 Scaled Ingredients:
Instructions
Step 1: In your favorite mixing bowl, combine your oats with any seeds you’re adding. This ensures even distribution—no one wants all the chia seeds in one sad ball.
Step 2: Here’s where the magic happens. Mix your peanut butter and sweetener first, before adding anything else. Work it together until it’s smooth and glossy. If it seems thick, don’t panic—just warm it slightly. You want it to look like dulce de leche, smooth enough to coat a spoon.
Step 3: Pour this gorgeous mixture over your oats and fold everything together. Use a wooden spoon and work it gently but thoroughly. The mixture should hold together when you squeeze it but not be wet or sticky.
Step 4: Add your chocolate chips last. This prevents them from breaking up during mixing, which can turn your beautiful balls into chocolate-streaked messes.
Step 5: Cover and chill for 20 minutes. I know you want to skip this step, but don’t. This rest time lets the oats absorb some moisture and makes rolling so much easier.
Step 6: Wet your hands (seriously, don’t skip this), and roll into balls about the size of large walnuts. A small cookie scoop keeps everything uniform, but your hands work perfectly fine.
Step 7: Freeze for 20 minutes to set, then transfer to the fridge. They’ll keep for two weeks.
Storage
Store in an airtight container in the refrigerator for up to 2 weeks, or freeze for up to 2 months. Frozen balls defrost in about 15 minutes at room temperature.
The Perfect No-Bake Peanut Butter Oatmeal Balls: A Recipe That Finally Makes Sense
Course: SnackCuisine: AmericanDifficulty: Easy12
servings10
minutes167
kcalWhip up these no-bake peanut butter oatmeal balls with just four pantry staples: oats, peanut butter, chocolate chips, and maple syrup.
Ingredients
- What You Need (Probably Already in Your Pantry):
1 heaping cup rolled oats – The foundation that holds everything together
1/2 cup smooth peanut butter – The star that brings richness and protein
1/4 cup mini dark chocolate chips – Because life’s too short for sad snacks
1/3 cup maple syrup or honey – The gentle sweetness that binds it all
- Optional Boosters (For When You’re Feeling Fancy):
2-3 tablespoons nut milk – If your mixture needs help coming together
1 tablespoon chia seeds or ground flax – Extra nutrition that doesn’t change the taste
Pinch of sea salt – Trust me, it makes everything better
Directions
- In your favorite mixing bowl (mine’s the same ceramic one my mother gave me fifteen years ago), combine your oats with any seeds you’re adding. This ensures even distribution—no one wants all the chia seeds in one sad ball.
- Here’s where the magic happens. Mix your peanut butter and sweetener first, before adding anything else. Work it together until it’s smooth and glossy. If it seems thick, don’t panic—just warm it slightly. You want it to look like dulce de leche, smooth enough to coat a spoon.
- Pour this gorgeous mixture over your oats and fold everything together. I use a wooden spoon (one of abuela’s, naturally) and work it like I’m folding masa for empanadas—gentle but thorough. The mixture should hold together when you squeeze it but not be wet or sticky.
- Add your chocolate chips last. This prevents them from breaking up during mixing, which can turn your beautiful balls into chocolate-streaked messes. Trust me, I’ve been there.
- Cover and chill for 20 minutes. I know you want to skip this step, but don’t. This rest time lets the oats absorb some moisture and makes rolling so much easier.
- Wet your hands (seriously, don’t skip this), and roll into balls about the size of large walnuts. I use a small cookie scoop because it keeps everything uniform, but your hands work perfectly fine.
- Freeze for 20 minutes to set, then transfer to the fridge. They’ll keep for two weeks, though they’ve never lasted that long in our house.
Notes
- Peanut Butter Temperature Matters: If your peanut butter has been in the fridge or feels thick, warm it with the maple syrup for 15-20 seconds in the microwave. This creates the perfect binding consistency—I learned this after too many crumbly disasters in my early days.
- Oats Are Not All Equal: Please use rolled oats, not quick oats or steel-cut. I made this mistake once and ended up with something Sofia described as “chunky peanut butter soup.” Rolled oats give you that perfect chewy texture that makes these feel like real cookies.
- Don’t Skip the Chill Time: That 20-minute rest in the fridge isn’t just a suggestion—it’s what separates success from sticky-hand frustration. The oats need time to absorb moisture, and your future self will thank you when rolling these becomes effortless instead of messy.
- Wet Hands = Perfect Balls: Always dampen your hands before rolling. This simple trick prevents sticking and creates smooth, professional-looking results. It’s the difference between looking like a kitchen pro and looking like you wrestled with cookie dough (and lost).
This recipe was lovingly adapted from a collection of family-tested treats, with my own cultural touches and hard-won kitchen wisdom added along the way. May it bring as much joy to your kitchen as it has to mine.
For more recipes follow us on Facebook and Pinterest.