Healthy No Bake Oatmeal Bars – The Best Guilt-Free Snack
Let me tell you about the afternoon that changed everything in my kitchen. I was standing there, flour in my hair, chocolate chip cookie dough covering every surface, and my eight-year-old nephew Marco asking for the hundredth time, “Zia Zara, are they ready yet?” The oven was still preheating, and I realized we had at least another hour before those cookies would be ready. That’s when my nonna’s voice echoed in my head: “Cara mia, sometimes the simplest solutions are right in front of us.”
Growing up in our little Tuscan trattoria, I learned that the best treats weren’t always the most complicated ones. My nonna had this magical way of creating something delicious from whatever was in the pantry, no fancy equipment required. That day with Marco, I channeled her spirit and created these no-bake oatmeal bars—and honestly, they’ve become more popular in my house than any elaborate dessert I’ve ever made.
Discover great ideas like Vegan Avocado Chocolate Mousse – The Best 2025 Healthy No-Bake Dessert as you read on.
What You’ll Love About These Bars
- Ready in 5 minutes (plus 30 minutes to set)—perfect for impatient little helpers
- Only 7 ingredients you probably already have in your pantry
- No baking skills required—if you can stir, you can make these
- Secretly healthy but tastes like a candy bar
- Endless variations to keep things interesting
Why These Bars Are Perfect for Beginning Cooks
Here’s the thing about cooking that I wish someone had told me when I first moved to America and felt overwhelmed by every recipe: you don’t need to be perfect to create something wonderful. These oatmeal bars are forgiving in the most beautiful way. Too wet? Add more oats. Too dry? A drizzle more honey. The mixture isn’t cooperating? Use your hands—they’re the best tools you have.
I remember making my first batch with trembling hands, worried I’d mess up this “simple” recipe. But you know what happened? They were delicious. Not perfect, but delicious. And that’s when I learned that cooking isn’t about precision—it’s about love, patience, and trusting your instincts.
What makes these bars so beginner-friendly is that they give you immediate feedback. You can see and feel when the consistency is right. You can taste the mixture and adjust the sweetness. There’s no waiting for the oven, no wondering if you overbaked them. It’s hands-on cooking at its finest.
The Magic Behind the Simple Ingredients

For the Base (The Heart of Our Bars):
- 1 cup old-fashioned oats – The foundation that gives us that satisfying chew
- 1 cup unsweetened shredded coconut – Adds texture and subtle tropical notes
- ¼ cup almond meal – Our secret for richness (don’t worry, I’ll give you alternatives)
- ¾ cup creamy peanut butter – The binding magic that holds everything together
- ½ cup honey – Nature’s candy that brings the sweetness
- ¼ teaspoon fine sea salt – The flavor enhancer you didn’t know you needed
- 1 teaspoon pure vanilla extract – The aromatic finishing touch
For the Chocolate Topping (Because Life’s Too Short):
- ¼ cup chocolate chips – Any kind you love will work
- 1 tablespoon peanut butter – Makes the chocolate silky and spreadable
Nutritional Information (per bar): 188 calories, 18g carbohydrates, 5g protein, 12g fat, 2.7g fiber. Remember, these numbers are approximate and what matters most is how these bars make you feel—nourished, satisfied, and happy.
🥄 Recipe Scaling Tool
Let’s Make Some Magic (Step by Step)

Picture this: you’re in your kitchen, maybe with a little helper by your side, ready to create something delicious without turning on a single appliance. Here’s how we do it:
Step 1: Create Your Base
In a small bowl, combine your oats, coconut, and almond meal. This is where you can let your little ones help—measuring and mixing is perfect for tiny hands. Set this gorgeous mixture aside.
Now, here’s where the magic happens. If your peanut butter is the natural kind (like mine usually is), it’ll be soft and easy to work with at room temperature. Just mix it with the honey in a large bowl until it’s smooth. But if you’re using a firmer peanut butter—the kind that stays solid at room temperature—don’t panic! Gently warm it with the honey in the microwave for about 30 seconds, or on the stovetop over low heat. We want it liquid enough to stir easily.
Step 2: Bring It All Together
Add your vanilla and salt to the peanut butter mixture. I always taste at this point—you want that perfect balance of sweet and salty that makes your taste buds sing. Now fold in your dry ingredients until everything is beautifully combined.
Here’s your consistency check: The mixture should hold together when you press it, but not be soupy. If it feels too wet, add oats one tablespoon at a time. Too dry? A little more honey or peanut butter will fix that right up.
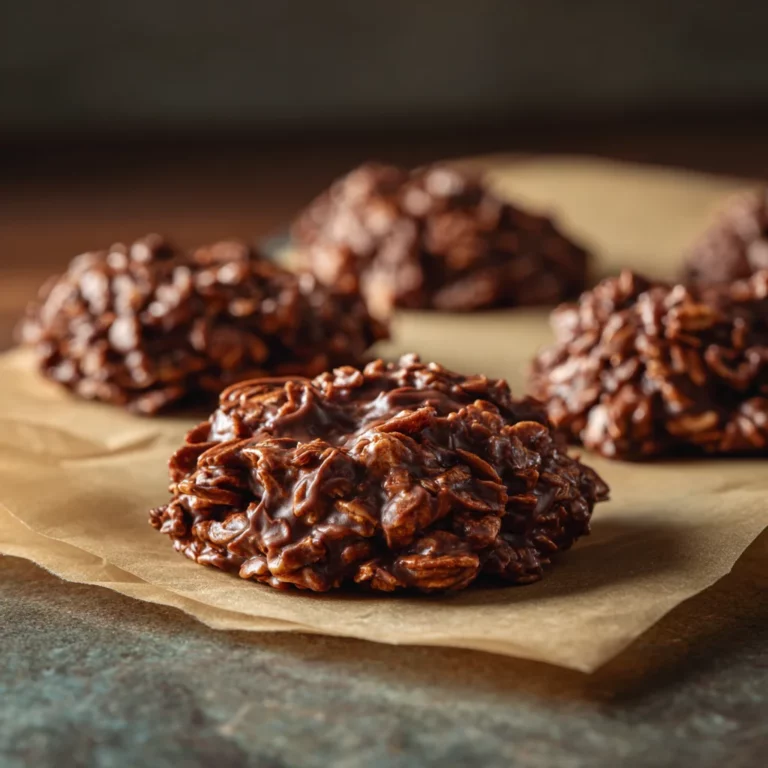
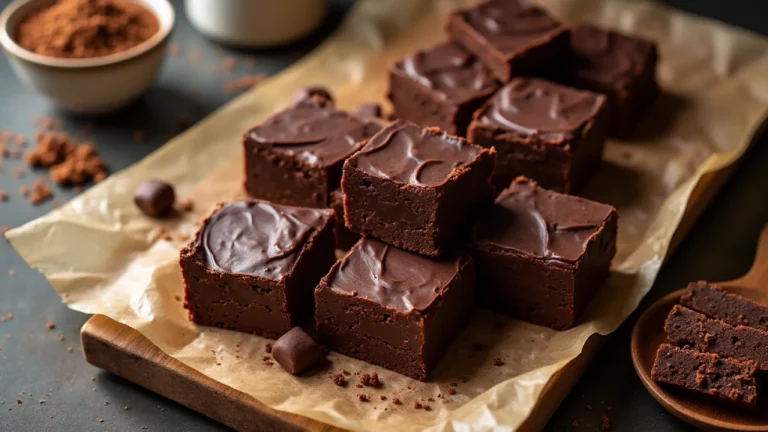
Step 3: Press and Shape
Using a spatula or your clean hands (I prefer hands—you get a better feel for the mixture), press everything into an 8×8 inch baking dish. Don’t stress about making it perfectly even. These are rustic treats, and a little character never hurt anyone.
Step 4: The Chocolate Crown
Melt your chocolate chips and peanut butter together—microwave works great, starting with 60 seconds, then stirring and heating in 30-second intervals until smooth. Or use a small saucepan over low heat if you prefer. Pour this glossy goodness over your bars and spread it evenly.
Step 5: The Hardest Part (Waiting!)
Pop them in the refrigerator for about 30 minutes, or leave them at room temperature if you have more patience than I do. Cut them before the chocolate is completely hard—trust me on this one.
When Life Gives You Dietary Restrictions, Make Variations
One thing I’ve learned from cooking for so many different people is that every family has its own needs. Maybe you have a tree-nut allergy (skip the almond meal and add an extra ¼ cup of oats). Perhaps someone in your house is avoiding refined sugar (maple syrup works beautifully instead of honey). Sunflower seed butter instead of peanut butter? Absolutely perfect.
The beauty of this recipe is its flexibility. I’ve made versions with:
- Cranberry-orange (dried cranberries and orange zest)
- Tropical paradise (extra coconut and dried pineapple)
- Chocolate lover’s dream (cocoa powder in the base, extra chocolate chips)
- Spiced autumn (cinnamon, nutmeg, and chopped dates)
The Real Secret Ingredient
You want to know what really makes these bars special? It’s not the perfect ratio of ingredients or the exact temperature of your kitchen. It’s the confidence you build every time you make them. Each batch teaches you something new about how ingredients work together, how textures develop, how flavors balance.
I watch beginning cooks in my workshops transform when they make these bars. They start tentative, measuring carefully, asking “Is this right?” every step of the way. But by the end, they’re adjusting sweetness by taste, eyeballing the consistency, making the recipe their own. That’s not just cooking—that’s cooking confidence.
Storage and Serving Tips from My Kitchen

These beauties will keep in an airtight container in the refrigerator for up to a week (though in my experience, they rarely last that long). You can also freeze them for up to two months—just thaw slowly at room temperature when you’re ready to enjoy them. And please, don’t microwave them to speed up the thawing. Good things come to those who wait, even if it’s just for a properly thawed oatmeal bar.
I love serving these slightly chilled in summer and at room temperature when it’s cooler. They’re perfect for lunchboxes, afternoon snacks, or those moments when you need something sweet but don’t want the guilt that usually comes with it.
Why This Recipe Matters (Beyond the Deliciousness)
In our family trattoria, we had a saying: “Every dish tells a story.” These oatmeal bars tell the story of busy modern life meeting timeless comfort. They represent the beautiful truth that you don’t need hours in the kitchen to create something meaningful.
They’re also a bridge recipe—perfect for getting kids involved in cooking, ideal for new cooks building confidence, and satisfying enough for experienced bakers who just want something simple and delicious. In a world that often feels complicated, these bars are a reminder that some of the best things in life are beautifully simple.
Healthy No Bake Oatmeal Bars – The Best Guilt-Free Snack
Course: BreakfastCuisine: AmericanDifficulty: Easy4
servings5
minutes30
minutes188
kcalIngredients
- For the Base (The Heart of Our Bars):
1 cup old-fashioned oats – The foundation that gives us that satisfying chew
1 cup unsweetened shredded coconut – Adds texture and subtle tropical notes
¼ cup almond meal – Our secret for richness (don’t worry, I’ll give you alternatives)
¾ cup creamy peanut butter – The binding magic that holds everything together
½ cup honey – Nature’s candy that brings the sweetness
¼ teaspoon fine sea salt – The flavor enhancer you didn’t know you needed
1 teaspoon pure vanilla extract – The aromatic finishing touch
- For the Chocolate Topping (Because Life’s Too Short):
¼ cup chocolate chips – Any kind you love will work
1 tablespoon peanut butter – Makes the chocolate silky and spreadable
Directions
- In a small bowl, combine your oats, coconut, and almond meal. This is where you can let your little ones help—measuring and mixing is perfect for tiny hands. Set this gorgeous mixture aside.
- Add your vanilla and salt to the peanut butter mixture. I always taste at this point—you want that perfect balance of sweet and salty that makes your taste buds sing. Now fold in your dry ingredients until everything is beautifully combined.
- Using a spatula or your clean hands (I prefer hands—you get a better feel for the mixture), press everything into an 8×8 inch baking dish. Don’t stress about making it perfectly even. These are rustic treats, and a little character never hurt anyone.
- Melt your chocolate chips and peanut butter together—microwave works great, starting with 60 seconds, then stirring and heating in 30-second intervals until smooth. Or use a small saucepan over low heat if you prefer. Pour this glossy goodness over your bars and spread it evenly.
- Pop them in the refrigerator for about 30 minutes, or leave them at room temperature if you have more patience than I do. Cut them before the chocolate is completely hard—trust me on this one.
Notes
- The mixture should hold together when pressed but not be soupy. Too wet? Add oats 1 Tbsp at a time. Too dry? Add more honey or peanut butter until it binds properly.
- Cut the bars before the chocolate is completely hard (about 20-25 minutes in fridge). This prevents cracking and ensures clean, even squares.
- If using firm peanut butter, gently warm it with honey for 30 seconds in microwave or on stovetop until easily stirred. Natural PB works great at room temperature.
- Store in airtight container in refrigerator for 5-7 days or freeze up to 2 months. Always thaw at room temperature—never microwave frozen bars.
🤔 Frequently Asked Questions
Ah, this takes me back to my first disastrous batch! I was so worried about the texture that I kept adding more and more oats until I had what looked like bird food instead of delicious bars.
The magic happens with the binding trio: peanut butter, honey, and a pinch of salt. The peanut butter acts as your primary glue—its natural oils and proteins create that perfect sticky base. The honey adds sweetness while also acting as a natural binder (thank you, ancient beekeepers!). And that little bit of salt? It doesn’t just enhance flavor; it actually helps the other ingredients bind more effectively.
Zara’s Kitchen Wisdom:
The consistency should feel like wet sand that holds together when you squeeze it. If it’s too crumbly, add a tablespoon more peanut butter or honey. Too wet? More oats will fix that right up. Trust your hands—they’re better than any measuring cup for getting the texture just right.
Temperature matters too. If your peanut butter is cold and thick, warm it slightly with the honey. This creates a smoother, more cohesive mixture that will hold your bars together beautifully. Remember: we’re creating an edible construction project here!
Oh, the crumbling catastrophe! I’ve been there, standing in my kitchen with a pan full of delicious-tasting rubble. The good news? This is completely fixable and preventable.
The pressing technique is everything. When you spread your mixture into the pan, don’t just pat it down gently like you’re tucking in a baby. Get in there with some authority! Use the back of a large spoon or even your clean hands to really compress the mixture. Think of it like making a sandcastle—you need that firm, compact base.
My Nonna’s Secret:
She used to press her biscotti dough with a clean kitchen towel for extra pressure without sticking. Try laying parchment paper over your mixture and pressing down firmly with a flat-bottomed measuring cup. Game changer!
Patience is also key. Let those bars set completely—at least 30 minutes in the fridge, though I usually wait an hour. The chocolate topping needs to firm up, and the base needs time for all those flavors and textures to meld together.
And here’s the crucial part: cut them while they’re still slightly soft. If you wait until the chocolate is rock-hard, you’ll get cracks and crumbles. I learned this the hard way after destroying an entire batch trying to cut through chocolate that was harder than my cutting board!
I love this question because it shows you’re thinking like a true cook—working with what you have! Yes, you absolutely can use instant oatmeal, but let me share what I’ve learned from experimenting with different oat types.
Instant oats will work, but they’ll create a softer, more tender bar. These oats are pre-cooked and chopped finer, so they absorb moisture more quickly and don’t provide the same hearty chew that old-fashioned oats give you. Think of it like the difference between al dente pasta and overcooked pasta—both are edible, but the texture experience is completely different.
Adjustment Tips:
If using instant oats, reduce the liquid ingredients slightly. Start with about 2 tablespoons less honey or peanut butter, then adjust as needed. The mixture might come together faster, so don’t panic if it seems too wet initially.
I actually discovered this by accident when I grabbed the wrong container during a particularly chaotic morning in my kitchen. The bars were delicious—just different. They reminded me of the softer, more cake-like treats my nonna used to make for us kids when we had sore throats.
For the most authentic texture, stick with old-fashioned oats when possible. But in a pinch? Instant oats will absolutely do the job. After all, the best recipe is the one you can actually make with what’s in your pantry!
Ah, now we’re talking about the beauty of simplicity! Sometimes the most elegant solutions are the ones that strip everything down to the essentials. This reminds me of my nonna’s philosophy: “If you can’t pronounce it or if you need more than one hand to count the ingredients, maybe you don’t need it.”
Here are my favorite three-ingredient combinations that create magical bars without any peanut butter:
Classic Coconut Bars:
Oats + Honey + Coconut Butter
Use the same proportions as our original recipe, but replace the peanut butter with coconut butter. The natural oils in coconut butter work beautifully as a binder, and you get that subtle tropical flavor that transports you to somewhere warm and sunny.
Sunflower Seed Power:
Oats + Maple Syrup + Sunflower Seed Butter
Perfect for nut allergies! Sunflower seed butter has that same creamy consistency as peanut butter but with a milder, slightly nutty flavor. Maple syrup adds complexity that pairs beautifully with the seeds.
Chocolate Lover’s Dream:
Oats + Honey + Tahini
This might sound unusual, but trust me on this one. Tahini (sesame seed paste) creates incredibly rich, fudgy bars. Add a tablespoon of cocoa powder if you want to go full chocolate, but even plain, these taste like sophisticated grown-up treats.
The key with any three-ingredient version is getting your ratios right. Start with the same proportions as our original recipe and adjust as needed. Remember, cooking is about tasting and adjusting—your palate is the best guide you have!
Your Next Delicious Adventure
I hope these no-bake oatmeal bars bring as much joy to your kitchen as they have to mine. Remember, cooking is not about perfection—it’s about connection, creativity, and the willingness to try. Every time you make these bars, you’re not just following a recipe; you’re creating memories, building skills, and proving to yourself that you can make something wonderful with your own two hands.
I’d Love to See Your Creations!
Made these bars your own with a unique twist? I’m always excited to hear about recipe variations from fellow food lovers. What combinations worked best in your kitchen? Did you discover any surprising ingredient swaps? Share your variations in the comments below—your creativity might inspire someone else’s next favorite treat!
And remember, every great cook started with simple recipes like this one. You’re already on your way.
This recipe was lovingly adapted from All Recipes, with personal touches and stories from my own kitchen adventures. Because the best recipes aren’t just instructions—they’re invitations to create something beautiful.
For more recipes follow us on Facebook and Pinterest.