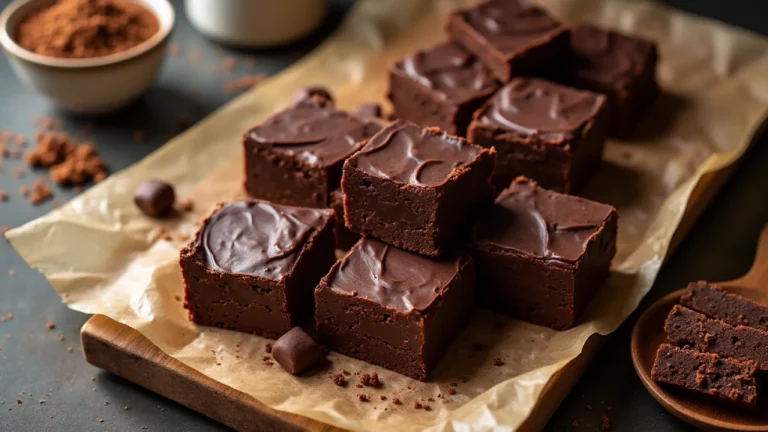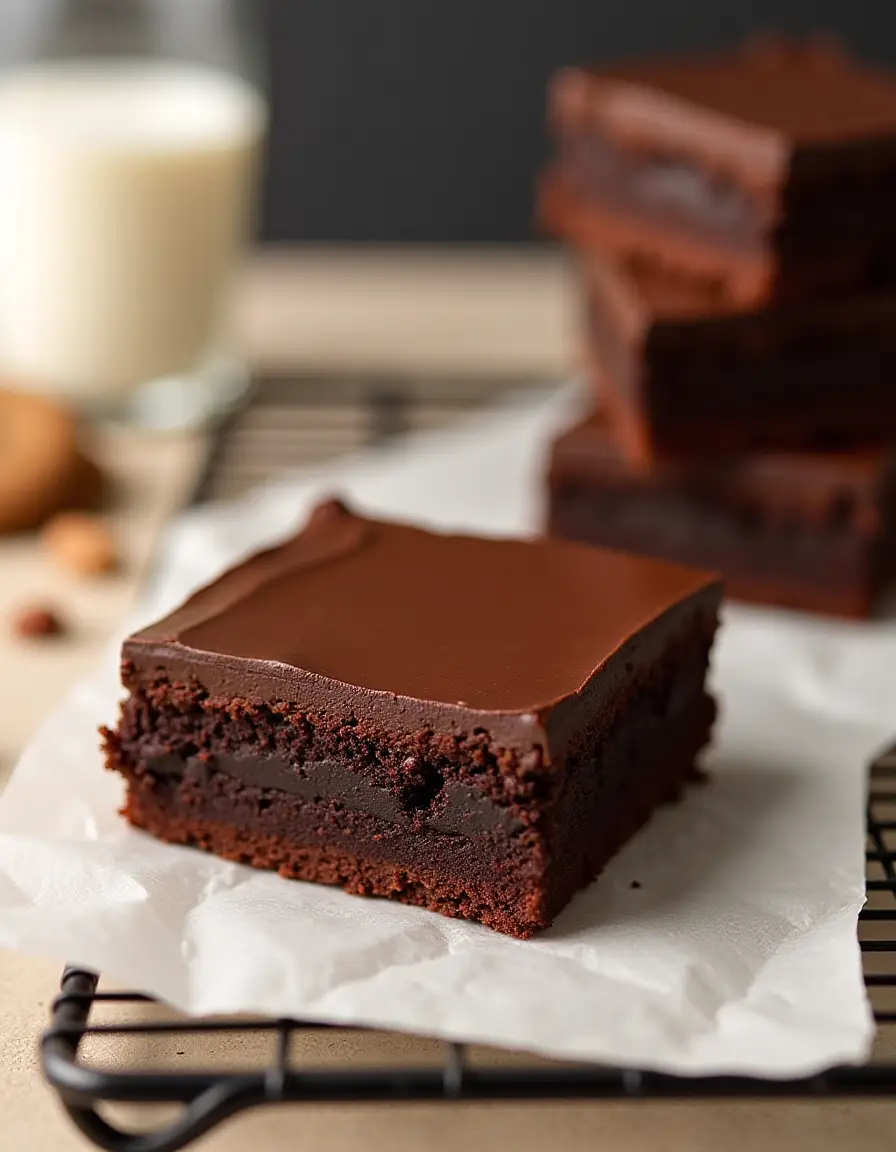
No Bake Brownies: The Best Easy Recipe for Summer
Let me tell you about the day I discovered these life-changing no-bake brownies. It was one of those sweltering Portland summer afternoons when even thinking about turning on the oven made me break into a sweat. My niece Sofia was visiting from Italy, and after hearing about American No Bake brownies for weeks, she was finally ready for her first taste. The problem? My kitchen felt like a pizza oven, and the last thing I wanted was to add more heat to the mix.
That’s when I remembered something my neighbor shared during one of our farmer’s market conversations – a magical brownie recipe that required absolutely no baking. I was skeptical, honestly. Growing up in my family’s trattoria, I’d learned that the best desserts required time, patience, and usually a very hot oven. But desperate times called for creative solutions!
🍫 Quick Takeaways:
- Ready in 30 minutes – No preheating, no baking, just mix and chill
- Only 4 ingredients needed – Almond butter, maple syrup, cocoa powder, and frosting
- Secretly healthy – Naturally sweetened, gluten-free, and completely vegan
- Foolproof for beginners – If you can stir, you can make these brownies
- Endlessly customizable – Add nuts, chocolate chips, or keep it simple
Why These No-Bake Brownies Will Change Your Life
I’m not being dramatic here – well, maybe a little, but that’s the Italian in me! These brownies have genuinely become my secret weapon for those moments when you need dessert right now. You know those times: unexpected guests, sudden chocolate cravings, or when your teenager announces they’re bringing friends over in twenty minutes.
What makes them so special? The texture, for one thing, is absolutely incredible. When I first bit into one, I couldn’t believe it hadn’t come from an oven. They’re fudgy and rich, with that perfect slightly gooey center that makes your shoulders do a little happy dance. Sofia’s reaction was priceless – she immediately asked for the recipe to take back to Tuscany!
But here’s what really won me over: these brownies are what I call “accidentally healthy.” Unlike my nonna’s traditional Italian desserts (which I adore, don’t get me wrong), these contain no butter, no eggs, no refined sugar, and no flour. Yet they satisfy that deep chocolate craving just as well as any decadent dessert I’ve ever made.
Looking for inspiration? Try our No-bake desserts—another easy no-bake treat for clean snacking.
The Magic Behind the 4-Ingredient Wonder

When I first heard “four ingredients,” I was skeptical. How could something so simple taste so complex? But that’s the beauty of good cooking – sometimes the most magical combinations are the simplest ones.
🥜 The Star Players:
Smooth Almond Butter: This is your base – it provides the rich, fudgy texture and acts as your “flour” replacement. I always use the drippy kind with no added sugar or salt. Trust me, the consistency matters here!
Pure Maple Syrup: Your natural sweetener and binding agent. This is where the magic happens – it brings everything together while adding that subtle caramel-like sweetness that complements chocolate so beautifully.
Unsweetened Cocoa Powder: I prefer Dutch-processed because it gives the most authentic, rich chocolate flavor. If you want to go bold, try dark cocoa powder – it’ll make your brownies taste almost sophisticated!
Chocolate Frosting: This is the crowning glory! You can use store-bought (no judgment here), or if you’re feeling adventurous, make your own dairy-free version.
Scaled Ingredients:
The Simple Process That Works Every Time
Here’s where I need to be completely honest with you – I was terrified the first time I made these. What if they didn’t hold together? What if they tasted like health food in disguise? But the process is so straightforward that even my most nervous cooking students have succeeded on their first try.
🍫 Step-by-Step Method:
Step 1 – Prep Your Pan: Line a square pan with parchment paper. This isn’t optional – trust me, you’ll want easy removal later! I learned this the hard way during my early American cooking adventures.
Step 2 – The Mix: In a large mixing bowl, combine your almond butter, maple syrup, and cocoa powder. Here’s where the magic happens – as you stir, you’ll watch it transform from separate ingredients into this gorgeous, fudgy mixture that already smells like heaven.
Step 3 – Press and Frost: Transfer your mixture to the lined pan and press it down firmly. I use the back of a spoon to smooth it out evenly. Then spread your frosting on top – this is where you can get creative with swirls and patterns!
Step 4 – The Hardest Part (Waiting): Refrigerate for at least 30 minutes. I know it’s tempting to check every five minutes, but resist! This chilling time is crucial for achieving that perfect brownie texture.
My Hard-Learned Tips for Perfect Results
Let me share some wisdom I’ve gained from making these brownies dozens of times (and from a few spectacular fails that taught me valuable lessons!):
The Consistency Game: Your mixture should feel like cookie dough – not too wet, not too dry. If it’s too thick (which happens with thicker almond butter), add a bit more maple syrup. Too thin? A little extra cocoa powder will save the day. I’ve learned that different brands of almond butter can behave very differently.
Don’t Skip the Chill Time: I made this mistake exactly once. Impatient and eager to impress some dinner guests, I tried to cut them after just 10 minutes in the fridge. The result? A delicious but messy chocolatey puddle. Those 30 minutes really do make all the difference!
The Warm Knife Trick: This is a game-changer I learned from my pastry chef friend. Run your knife under hot water, dry it quickly, then slice. You’ll get clean, bakery-perfect cuts every single time. It’s like magic!
Making Them Your Own

One thing I absolutely love about this recipe is how it invites creativity. It reminds me of my cooking philosophy – start with a solid foundation, then let your personality shine through.
For the Nut-Free Friends: Swap the almond butter for sunflower seed butter or peanut butter. Each brings its own personality to the brownies.
Add Some Crunch: Chopped walnuts, toasted almonds, or even a sprinkle of flaky sea salt on top can transform these from simple to sophisticated.
Fruit Lovers: Dried cherries or cranberries add a lovely tartness that balances the rich chocolate.
Extra Indulgent: Mini chocolate chips never hurt anyone! Just fold them in gently at the end of mixing.
Keto-Friendly Version: Use sugar-free maple syrup and sugar-free frosting – they work beautifully and no one will know the difference.
Storage Secrets and Make-Ahead Magic
These brownies are incredibly forgiving when it comes to storage, which makes them perfect for meal prep or making ahead for entertaining. I’ve stored them in the refrigerator for up to two weeks (though they rarely last that long in my house!), and they actually improve in texture after the first day.
For longer storage, they freeze beautifully for up to six months. I like to cut them into individual squares and freeze them in an airtight container. They thaw quickly at room temperature, or you can eat them slightly frozen for a different but equally delicious experience – like a fudgy ice cream bar!

No Bake Brownies: The Best Easy Recipe for Summer
Course: BreakfastCuisine: AmericanDifficulty: Easy12
servings10
minutes30
minutes180
kcal40
minutesEnjoy rich, fudgy brownies with just four ingredients! These no-bake brownies are made without any flour, eggs, or butter.
Ingredients
1 cup almond butter
1/2 cup maple syrup
2/3 cup cocoa powder
1 cup chocolate frosting
Directions
- Prep Your Pan: Line a square pan with parchment paper. This isn’t optional – trust me, you’ll want easy removal later! I learned this the hard way during my early American cooking adventures.
- The Mix: In a large mixing bowl, combine your almond butter, maple syrup, and cocoa powder. Here’s where the magic happens – as you stir, you’ll watch it transform from separate ingredients into this gorgeous, fudgy mixture that already smells like heaven.
- Press and Frost: Transfer your mixture to the lined pan and press it down firmly. I use the back of a spoon to smooth it out evenly. Then spread your frosting on top – this is where you can get creative with swirls and patterns!
- The Hardest Part (Waiting): Refrigerate for at least 30 minutes. I know it’s tempting to check every five minutes, but resist! This chilling time is crucial for achieving that perfect brownie texture.
Notes
- Quality matters: Use the best cocoa powder you can afford – it really makes a difference in the final flavor.
- Room temperature is key: Let your almond butter come to room temperature before mixing for easier blending.
- Patience pays off: These taste even better after sitting overnight – the flavors meld together beautifully.
- Double the batch: Trust me on this one – you’ll wish you had made more!
Absolutely! While I personally think the frosting makes them extra special, they’re delicious on their own. You might want to add a pinch of vanilla extract or a sprinkle of sea salt to enhance the flavor when skipping the frosting.
Yes, absolutely! You might need to add a bit more maple syrup to get the right consistency. Start with an extra tablespoon and work from there. The mixture should hold together but not be dry – think cookie dough texture.
Definitely! Natural cocoa powder will work fine, though the flavor will be slightly more acidic and less mellow. Some people prefer it that way – it’s really a matter of personal taste. Dark cocoa powder will give you an even richer, more intense chocolate flavor.
They should feel firm to the touch and not leave indentations when you gently press the surface. If they’re still too soft after 30 minutes, give them another 15-20 minutes in the fridge. The frosting should also be set and not sticky.
These are perfect make-ahead desserts! They actually taste better after sitting for a day or two, as the flavors develop and meld together. Just keep them covered in the refrigerator until you’re ready to serve. They’ll stay fresh for up to two weeks!
Absolutely! Peanut butter, cashew butter, or sunflower seed butter all work wonderfully. Each will give a slightly different flavor profile. Sunflower seed butter is great for nut-free versions, while peanut butter adds a classic PB-chocolate combination.
Yes! The base recipe (almond butter, maple syrup, and cocoa powder) is completely vegan and naturally gluten-free. Just make sure to use vegan frosting if you want to keep them 100% plant-based. Always check your frosting ingredients to be sure!
Store them covered in the refrigerator for up to two weeks. For longer storage, they freeze beautifully for up to six months! Cut them into individual squares before freezing for easy serving. They thaw quickly at room temperature or can be enjoyed slightly frozen.
Yes! Unlike traditional raw cookie dough, these contain no raw eggs or flour that need heat treatment. All ingredients are safe to eat raw, making them perfect for kids to help make and enjoy. They’re actually healthier than most traditional brownies!
Final Thoughts: When Simple Becomes Extraordinary

You know what I love most about these no-bake brownies? They remind me that some of the best cooking happens when we let go of our preconceptions and embrace simplicity. When I first moved to America, I thought everything had to be complex to be impressive. But recipes like this one taught me that sometimes the most magical moments in the kitchen come from the most unexpected places.
These brownies have become my go-to for so many occasions – from Sofia’s summer visit to last-minute potluck contributions, from midnight sweet tooth emergencies to meal prep Sunday treats. They bridge the gap between indulgent and wholesome in a way that makes everyone happy.
Whether you’re a complete beginner who’s intimidated by traditional baking, a busy parent looking for quick dessert solutions, or an experienced cook curious about healthy alternatives, these brownies will surprise and delight you. They’re proof that you don’t need a fancy kitchen, exotic ingredients, or hours of preparation to create something truly special.
So next time you’re craving something sweet but don’t want to deal with ovens and measuring cups and all the fuss of traditional baking, remember these little squares of magic. Mix them up, let them chill, and prepare to be amazed by how something so simple can taste so extraordinary.
I’d love to hear about your experience making these! Did you add any special touches? How did your family react? Share your stories in the comments below – there’s nothing I enjoy more than hearing how recipes travel from my kitchen to yours and become part of your own food story. Happy cooking, my friends!
For more recipes follow us on Facebook and Pinterest.