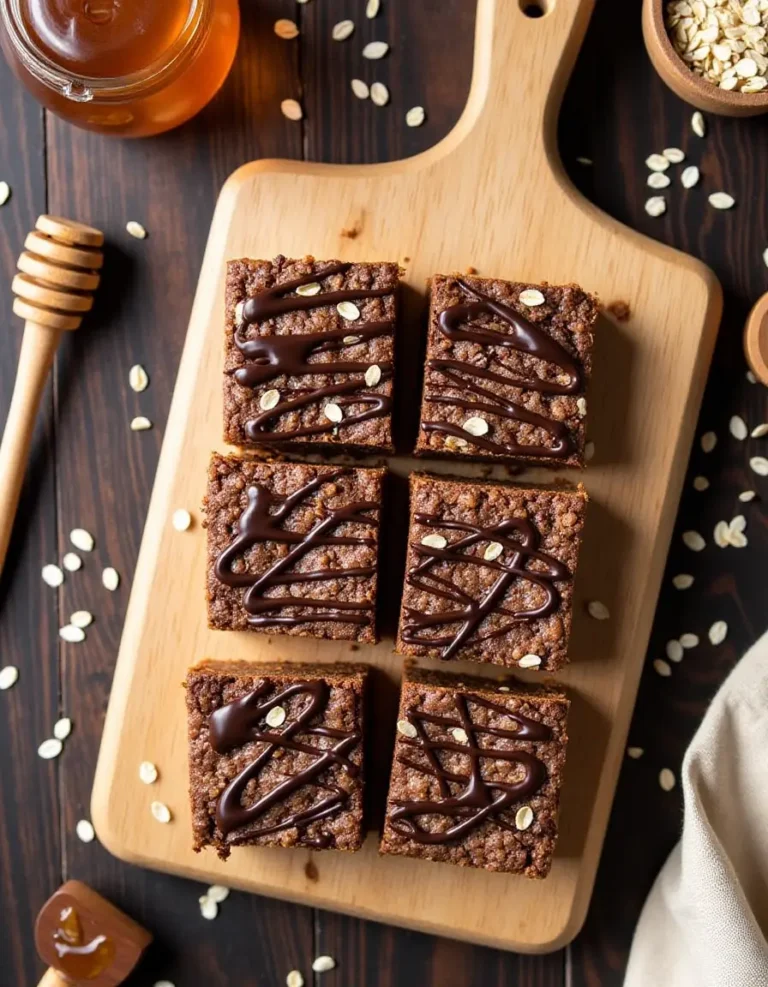
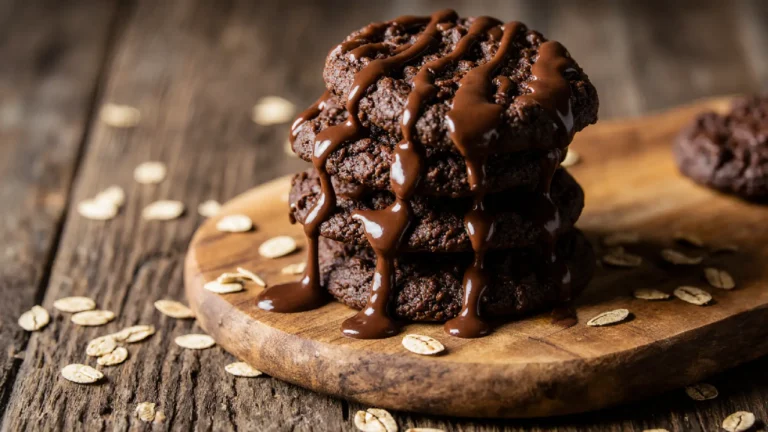
Delicious & Easy No Bake Cookies Without Peanut Butter
Let me tell you about the Great Cookie Disaster of 2019. Picture this: my son Jake’s 7th birthday party, twelve excited kids waiting for dessert, and me confidently announcing we’d made “science cookies” together. Except these particular no-bake cookies never actually set up. What I served was essentially chocolate oat soup with a spoon.
Emma, being the diplomatic 9-year-old she is, called it “deconstructed cookies.” The other kids? Well, let’s just say I learned that day why precision matters more than enthusiasm in the kitchen.
Here’s the thing though – that disaster led me down a rabbit hole of candy-making science that completely changed how I approach no-bake cookies. After testing this recipe seventeen times (yes, I counted, because that’s what I do), I can tell you exactly where things go wrong and, more importantly, how to get them absolutely right.
Looking for inspiration? Try this creamy Oreo no bake dessert too.
Key Takeaways: Your No-Bake Success Blueprint
- Temperature is everything: Achieve 235°F (soft ball stage) for cookies that actually set
- Timing matters: That “one minute” boil time is more like 3-5 minutes for most stoves
- The rolling boil test: If you can stir away the bubbles, it’s not ready yet
- Oat ratios save the day: Too gooey? Add more oats. Too crumbly? You overcooked the sugar
- Endless variations: Once you master the base, you can customize for any dietary need
Why No-Bake Cookies Fail (And It’s Not Your Fault)
I’ll be honest – I used to eyeball measurements until I had one too many kitchen failures. But with no-bake cookies, we’re essentially making candy. And candy-making follows very specific scientific principles that don’t care about your good intentions.
The problem with most no-bake cookie recipes? They treat the sugar mixture like it’s just “heating up ingredients” when you’re actually performing a precise chemical transformation. When you heat sugar with liquid, you’re creating a syrup that needs to reach the correct consistency to bind with your oats and set properly.
In my testing, I’ve found that the most common failures happen because:
The “one minute” myth: Most recipes say boil for one minute, but that’s assuming your stove runs hot and your pot conducts heat perfectly. In reality, you need to focus on temperature, not time.
What looks like boiling isn’t always boiling: You need what candy makers call a “rolling boil” – one where no matter how vigorously you stir, those bubbles keep coming. If stirring makes the bubbles disappear, you’re not there yet.
Altitude and humidity matter: I learned this the hard way when my usually-perfect recipe failed during a particularly humid Portland summer. Moisture in the air affects how sugar behaves.
The Science Behind Perfect No-Bake Cookies
Here’s what’s actually happening in that saucepan (Emma loves when I explain this part): We’re creating what’s called a “soft ball stage” sugar syrup. At exactly 235°F to 240°F, sugar molecules form the perfect consistency to bind with oats while still allowing the mixture to set into a chewy-but-firm cookie.
Too low a temperature (under 230°F)? Your cookies will be eternally gooey. Too high (over 245°F)? They’ll be so hard you could use them as hockey pucks. Pro tip from my pastry days: temperature matters more than you think.
The milk and butter aren’t just flavor additions – they’re crucial to the chemistry. The fat from butter helps create that signature fudgy texture, while the milk provides the liquid needed for proper sugar dissolution. When these reach the soft ball stage together, they create a syrup that will firm up perfectly as it cools.
The Foolproof Method (Tested 17 Times)
After all my testing, here’s the method that works every single time:
Ingredients (Precisely Measured, Please)

- 2 cups white sugar
- ½ cup butter
- ½ cup milk
- 3 cups quick-cooking oats
- 3 tablespoons cocoa powder
- 1 teaspoon vanilla extract
🍪 Recipe Scaler
The Method That Actually Works
Step 1: Prep Your Workspace
Line baking sheets with waxed paper or parchment. Trust me on this - trying to do it while your sugar mixture cools is like trying to change a tire while the car's moving.
Step 2: The Critical Boiling Phase
In a medium saucepan, combine sugar, butter, and milk. Here's where most recipes go wrong: they tell you to use medium-high heat. Don't. Start with medium-low heat and let everything melt together slowly. This ensures all the sugar dissolves completely before you start the serious boiling.
Once everything's melted and combined, increase to medium heat. You want the mixture to come to a rolling boil - that's a boil where the bubbles don't disappear when you stir. This usually takes 3-5 minutes, not the mythical "one minute" most recipes claim.
The temperature test: If you have a candy thermometer, use it. You want 235°F. No thermometer? Use the cold water test: drop a small spoonful of the mixture into a cup of cold water. If it forms a soft ball that you can pick up but easily flatten, you're there. If it's still syrupy, keep cooking.
Step 3: The Quick Mix
Remove from heat immediately and stir in cocoa powder and vanilla. Then add your oats and mix quickly but thoroughly. The mixture should be thick enough to hold its shape when dropped, but not so stiff you can't stir it.
Step 4: The Drop and Wait
Working quickly, drop spoonfuls onto your prepared sheets. They'll look a bit soft at first - that's normal. Let them sit at room temperature for at least 30 minutes. For firmer cookies, I always recommend an hour in the refrigerator.
Troubleshooting: When Things Go Sideways
Even with perfect technique, sometimes things don't go as planned. Here's what I've learned from my many (many) test batches:
Problem: Cookies won't set up
Your sugar mixture didn't get hot enough. Next time, cook longer and test with the cold water method. For this batch, you can actually reheat the mixture, bring it back to proper temperature, and re-drop the cookies.
Problem: Cookies are too hard/crumbly
You overcooked the sugar mixture. Unfortunately, there's no fixing this batch, but now you know to watch your temperature more carefully next time.
Problem: Cookies are gooey even after hours of waiting
This usually happens on very humid days. Stir in an extra ½ cup of oats and let them set in the refrigerator overnight.
Problem: Mixture is too thick to drop
Work faster next time - the mixture sets quickly once you remove it from heat. For this batch, you can add a tablespoon of hot milk to loosen it up.
Tested Variations (Because My Family Gets Bored)

Once you master the basic technique, the world is your oyster. Here are variations I've successfully tested:
The Coconut Lover's Version:
Add ½ cup shredded coconut with the oats. My husband (who's usually skeptical of my recipe experiments) actually requests these.
Nutty Chocolate Delight:
Stir in ½ cup chopped walnuts or pecans after adding the oats. The nuts add a lovely texture contrast.
Mint Chocolate (Emma's Favorite):
Replace vanilla with ½ teaspoon peppermint extract. Use extract from my mint plants when they're in season for an even fresher taste.
Double Chocolate Indulgence:
Increase cocoa powder to ½ cup and add ½ cup mini chocolate chips with the oats. Rich doesn't begin to describe these.
Reduced Sugar Version (For My Diabetic Husband):
Use 1½ cups sugar instead of 2, but you'll need to be extra careful with your cooking time as the lower sugar content changes the chemistry slightly.
The Dietary Modification Game-Changer
What I love about mastering this base recipe is how adaptable it becomes. Need dairy-free? Use coconut oil instead of butter and your favorite non-dairy milk. The technique stays exactly the same, though you might need to add extra oats as plant-based milks don't achieve quite the same consistency.
For a vegan version, I've had success using: - ½ cup coconut oil (solid, not melted) - ½ cup unsweetened almond milk - Extra ¼ cup cocoa powder (to compensate for the different flavor profile) - An extra ½ cup oats (plant-based mixtures tend to be slightly softer)
The key with any substitution is understanding that you might need to adjust the oat ratio to get the right consistency.
Storage and Serving (The Practical Stuff)

These cookies keep beautifully in an airtight container for up to a week - though they've never lasted that long in my house. Jake considers them a major food group.
For longer storage, they freeze wonderfully. Layer between waxed paper in a freezer-safe container, and they'll keep for up to three months. They thaw quickly at room temperature, making them perfect for unexpected guests or those "I need cookies NOW" moments we all have.
Pro tip: If you're making these for a crowd, the recipe doubles perfectly. Just use a larger saucepan and be patient with the heating process - larger quantities take longer to reach the proper temperature.
Why This Recipe Matters (Beyond Just Cookies)
Here's what I find fascinating about mastering no-bake cookies: it teaches you fundamental candy-making principles that apply to so many other recipes. Understanding soft ball stage opens doors to making fudge, pralines, and even some buttercream frostings.
More importantly, it's a perfect introduction to precision baking for kids. Emma and Jake have both learned to use the candy thermometer, and they understand why we can't just "eyeball" the sugar mixture. It's practical chemistry in action.
And honestly? There's something deeply satisfying about creating something delicious without turning on the oven. During Portland's occasional heat waves, these cookies have saved many a summer gathering.
Delicious & Easy No Bake Cookies Without Peanut Butter
Course: BreakfastCuisine: AmericanDifficulty: Easy36
cookies10
minutes30
minutes189
kcalEnjoy a quick, hassle-free treat with these no-bake cookies without peanut butter. Made with simple ingredients like sugar, butter, milk, cocoa, oats, and vanilla
Ingredients
2 cups white sugar
½ cup butter
½ cup milk
3 cups quick-cooking oats
3 tablespoons cocoa powder
1 teaspoon vanilla extract
Directions
- Line baking sheets with waxed paper or parchment. Trust me on this - trying to do it while your sugar mixture cools is like trying to change a tire while the car's moving.
- In a medium saucepan, combine sugar, butter, and milk. Here's where most recipes go wrong: they tell you to use medium-high heat. Don't. Start with medium-low heat and let everything melt together slowly. This ensures all the sugar dissolves completely before you start the serious boiling.
- Once everything's melted and combined, increase to medium heat. You want the mixture to come to a rolling boil - that's a boil where the bubbles don't disappear when you stir. This usually takes 3-5 minutes, not the mythical "one minute" most recipes claim.
- The temperature test: If you have a candy thermometer, use it. You want 235°F. No thermometer? Use the cold water test: drop a small spoonful of the mixture into a cup of cold water. If it forms a soft ball that you can pick up but easily flatten, you're there. If it's still syrupy, keep cooking.
- Remove from heat immediately and stir in cocoa powder and vanilla. Then add your oats and mix quickly but thoroughly. The mixture should be thick enough to hold its shape when dropped, but not so stiff you can't stir it.
- Working quickly, drop spoonfuls onto your prepared sheets. They'll look a bit soft at first - that's normal. Let them sit at room temperature for at least 30 minutes. For firmer cookies, I always recommend an hour in the refrigerator.
Notes
- Temperature Target: 235°F (soft ball stage) - this is non-negotiable for proper setting
- Timing Reality Check: Ignore the "one minute" rule - cook until you reach temperature, usually 3-5 minutes of rolling boil
- Humidity Helper: On very humid days, add an extra ¼ cup of oats to compensate for moisture in the air
- Storage Secret: These actually improve after a day in an airtight container - the flavors meld and the texture perfects
🍪 Frequently Asked Questions
Everything you need to know about no-bake cookies without peanut butter
🤔 No questions match your search. Try different keywords!
The Final Word on No-Bake Success
After seventeen test batches, countless kitchen disasters, and more sugar temperature readings than I care to count, I can confidently say that perfect no-bake cookies aren't about luck - they're about understanding the science.
The beauty of this recipe isn't just that it's peanut-free (though that opens doors for so many people with allergies). It's that once you understand the principles, you'll never have another failed batch. You'll know exactly what went wrong and how to fix it.
More than that, you'll have a reliable go-to recipe that adapts to your family's needs and preferences. Need them dairy-free? You know how. Want them less sweet? You understand the adjustments. Craving a different flavor profile? The base technique remains your foundation.
So go ahead, give these a try. Start with the basic recipe until you master the technique, then let your creativity run wild. And if your first batch doesn't turn out perfectly? That's not failure - that's data for your next attempt.
Because here's what I've learned in my twelve years of food blogging: the best cooks aren't the ones who never make mistakes. They're the ones who understand their mistakes well enough to never make the same one twice.
I'd love to hear how your no-bake adventure goes! Drop a comment below with your results, variations, or questions. Did you try the mint version? How did the coconut addition work out? And please, share your own discoveries - some of my best recipe improvements have come from readers' experiments.
Happy baking (or should I say, happy not-baking)!
Sarah
Don’t miss our vegan avocado chocolate mousse for another plant‑based treat that feels fancy but takes minutes.
For more recipes follow us on Facebook and Pinterest.